Archive

Archive for August, 2010

Error message when you run a report in Microsoft Dynamics CRM 4.0: “Reporting Error. The report cannot be displayed”

August 31st, 2010 DynamicsMSCRM No comments

kb946585

SQL Reporting Services 2008

If the Network Service Account is not used as the Log On As for the Sql Reporting Service you will need to add permissions to the Config and Organization databases for the selected Log On Service User.

- On the Microsoft SQL Reporting Services server, click the Start button, and thenpoint to Administrative Tools, and then click Services.
Locate the SQL Server Reporting Services service and note the value that is listed in the Log On As column.

- Grant the appropriate account permission to access the Microsoft Dynamics CRM databases.

- If SQL Reporting Services and the SQL Server databases are installed on the same server and the account identified in step 1 is Network Service, follow these steps:

- Start SQL Server Management Studio. To do this, click the Start button, and then point to All Programs, point to Microsoft SQL Server 2005, and then click SQL Server Management Studio.

- Expand Security, expand logins, right-click Log On As User, and then click Properties.
Click User Mappings.

- Click to select the Organization_name_MSCRM check box, and then click to select the public check box and the CRMReaderRole check box.

Note The Organization_name placeholder is a placeholder for the actual organization name.

- Click to select the MSCRM_Config check box, and then click to select the public check box and the CRMReaderRole check box.
Click OK.

  • Share/Bookmark
Categories: Report Permissions, Report Server, SSRS Tags:

Phone and Video Calls from Gmail

August 25th, 2010 DynamicsMSCRM No comments

Although this is not really CRM its related as I spend half my day on the phone with CRM.

Google Voice and Video Chat was released August 25th and allows you to make phone and video calls from your gmail account free anywhere in the US.

I have been using MagicJack for the past year with good results but there are some locations that do not allow for a clear connection and some numbers that reject a MagicJack call.

Setup with straight forward and only took a few minutes. In addition you can route incoming calls to any other other number.

Video and phone calls from Gmail

Download

  • Share/Bookmark
Categories: Uncategorized Tags:

MS CRM Report Subscriptions 4.0/2011

August 24th, 2010 DynamicsMSCRM No comments

How to Create a Microsoft Dynamics CRM 4 Report Subscription in less than 15 minutes

UPDATE FOR 2011: 2011 Report Subscriptions

Scheduling report subscriptions is fairly easy if you know the right steps to take. Following the steps below should get you up and running with report subscriptions fairly quickly and you can begin Wowing your users with the delivery of reports directly to their Outlook Inbox.

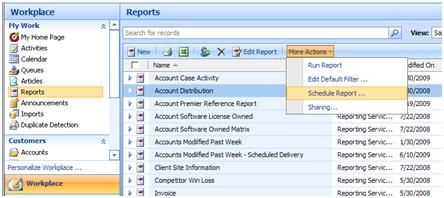
The first step you need to take is to open your CRM application and navigate to Workplace, Reports. Identify and Select the report that you want to schedule, select More Actions from the top menu bar and select Schedule Report from the dropdown.

I will select the Account Distribution report for scheduling:
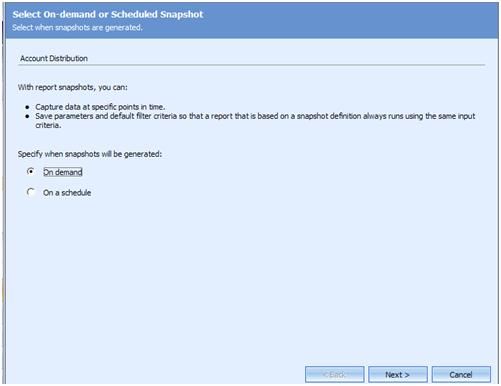
A wizard dialogue window will open. Select On Demand and Next. We don’t need to select On Schedule because we don’t necessarily want to run Report Snapshots; we want to setup a Subscription for delivery. If you decide you want to create Snapshots in addition to a Subscription, you can do that later from the Report Server:
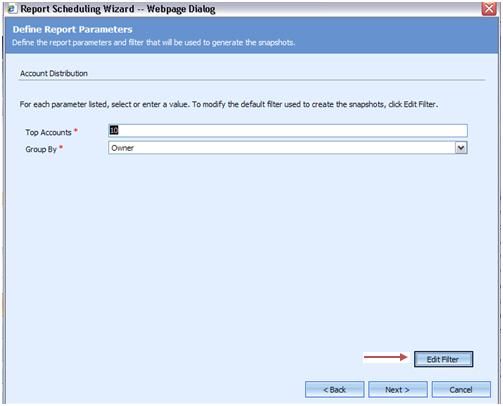
If you want to change the Default Parameters used for the Subscription, select Edit Filter, select the filtering criteria, and Save or leave the defaults provided and Select Next
Select “No just save the Snapshot Definition and select Save. The report Snapshot Definition was successfully credited. Select Finish:
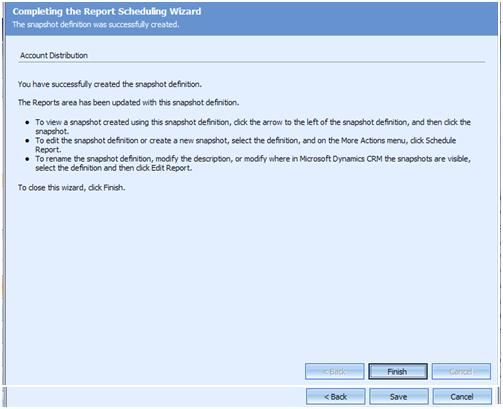
Now if you look at your Report grid in CRM you will see a new report listed with the same name referenced on the Save wizard dialogue window. In this case the report name was: Account Distribution – On-demand Snapshots 7_17_2009 9_15 AM:
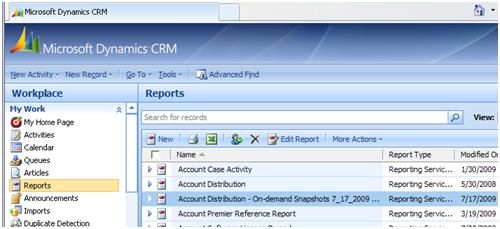
If you select the report and select the Edit Report button, a new window will open showing you the details of the report. Select Administration and you will see that the report is set to Individual View only as users in the Organization do not need to view this report directly from the Dynamics Application. Leave the Settings and close the window.

Now we will move on to the CRM Report Server

You can access your Reporting Services Home page by using the URL http://NameofReportServer/reports. The Reporting Services Home page URL is different than the Report Server which is located at http://NameofReportServer/reportserver so ensure you are using the correct URL.

You will see a list of all your Report folders after the page opens. In this example you do not see the full name of the Report folder but you will see the full name in your deployment. In the upper right-hand corner of the Reporting Services Home page, select Show Details
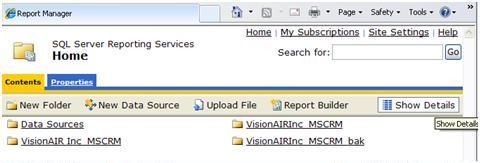
You will notice that the page layout changes slightly and you can now see a new link name Edit

Select the Report folder that contains the reports for your CRM 4.0 deployment and select the 4.0 folder
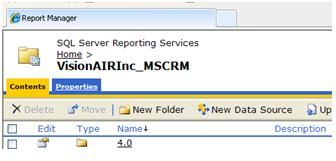
After you select the 4.0 folder, you will see a list of your CRM reports. Locate the report that you created in the CRM application. You can easily find it as the report name, which in this example was “Account Distribution – On-demand Snapshots 7_17_2009 9_15 AM”, is included in the Description field.

Select the Edit Icon link located to the left of the report

Select the Subscriptions tab
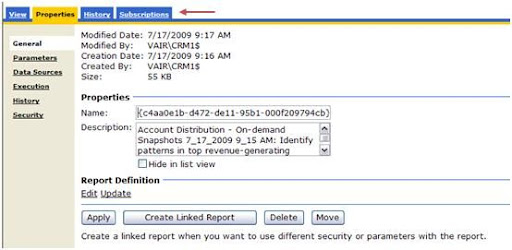
Select the New Subscription button
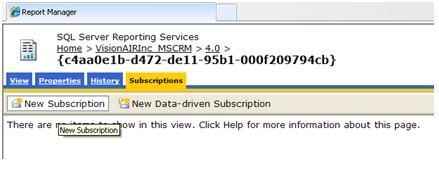
This will open the window that allows you to enter the details for the report subscription
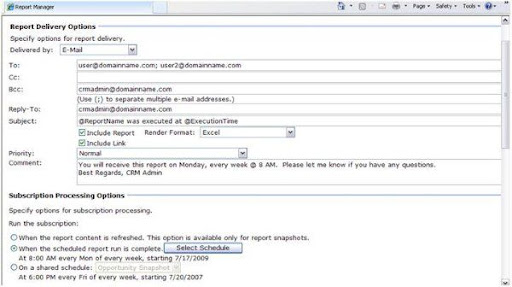
You can now enter the information that will determine how the report is delivered, who receives it and the report delivery frequency.

• Leave the default delivery method of E-mail selected

• Enter the e-mail address for the recipients

• I generally include my e-mail address in the BCC field to ensure the report runs  as expected at least the first few times and the format is what I intended

• Enter the Reply-To e-mail address

• Modify the Subject line for whatever you prefer

• This will be the subject line of the e-mail

• At a minimum Replace “ @ReportName” with the actual Report Name otherwise the value will be the GUID of the report which is not a user friendly name

• Leave the Include Report and select the Render Format option you prefer. I generally use Excel as this gives users the option to manipulate the report data in a format familiar to them.

• Leave the Include Link only if it is ok with you that users open the Report directly from the Report Server rather than through the CRM application

• Set Priority

• Add Comments

• Select the Schedule you want the Report to run by selecting the Select Schedule button

• Select the OK button and the Subscription is created and saved

Saving the Subscription will create a SQL job that runs on the date and time you indicated to deliver the report to your recipients. If you have not yet setup your Report Server for E-Mail Delivery then review this MSDN article for the steps needed to implement that service.

Once you create a few subscriptions, you will be able to take a few shortcuts that will reduce the steps needed to create new subscriptions. After generating one or two of these subscriptions, you will be an expert.

NOTE: You may see following error while creating report subscription :
“Failure sending mail: The selected report is not ready for viewing. The report is still being rendered or a report snapshot is not available.Mail will not be resent”

This error occurs because of the way report excution set in the report server.
If you change the Excution property to “Always run this report with the most recent data” , it will resolve the issue

Source From: Donna Edwards

  • Share/Bookmark
Categories: Reports Tags:

MS CRM Load Balancing, a simpler option.

August 22nd, 2010 DynamicsMSCRM No comments

I have been struggling with Microsoft’s concept of CRM load balancing and server roles. After reading everything that I could get my hands on it appeared that just installing two or more full CRM installs would be the simplest and most redundant solution in some situations. While doing more research I found this blog entry from Customer Effective’s CEBlog that outlines the solution in a very simple and straight forward way which I have included below.

Can I run two Async Services?
According to the CRM Planning Guide at the botton of page 4-59, Miscrosoft says you can run two asyn services at once on seperate platform servers or full application servers. However, there is an known issue that is corrected in Update Rollup 7 or via this KB975490
___________________________________________________________________

Separate Server Roles and Microsoft Dynamics CRM 4.0
One of the choices when deploying Microsoft Dynamics 4.0 is whether or not to separate server roles.

When you install Dynamics CRM on a server, the application layer (web server, CRM application) and the platform layer (asynchronous service, discovery service, sdk) run on the same server.

There are several reasons that you would want to separate server roles. For example, if you have a heavy quantity of asynchronous activity, such as imports, workflows or plugins, you don’t want to affect availability of the application, and you don’t want asynchronous operations to have a long backlog and slow down the amount of time it takes for new asynchronous operations to be processed.

Traditional Approach
The traditional way to separating server roles with Dynamics CRM 4.0 Enterprise was to select the separate server roles option when installing. This gives you the option to install the roles that you want on a server, so you can have one server be the application role, and have another be the platform role, for example.

Complexity
Before you do this, you should be aware that going with the separate server roles may introduce some complexity into your environment. When everything runs on one server, everything uses the same server URL; however, if the platform role is separated, things that hit the discovery service, such as the outlook client, email router, and custom code will need to hit the URL of the platform server, not the application server URL, and having two different addresses may add some confusion for certain users. If you elect to deploy your environment Internet facing, or IFD, so you have CRM available to people not on your network, there is a lot of complexity and frankly this option is not very well documented in the IFD scenarios documentation.

IFD and Separate Server Roles
if you have separate server roles, you will need to expose both the app server website and the platform server website externally. You will need to run the ifd tool on both the application and the platform server–this is not documented in the ifd scenarios document, but is required if you want external users to be able to configure Outlook clients in ifd mode, You will need to have ssl certificates on both the application and platform server, which will cost you extra. The IFD scenarios document doesn’t say this, but you will have to have your platform server URL be organization specific–if your CRM URL is myorg, for example, you will need the URL to be something like myorg.platform.company.com. again, not documented, but CRM will expect the org name to be in the Url when you configure the Outlook client. Users will have to configure their outlook clients using the platform server URL, not the CRM application URL. The reason for that is the outlook client connects to the discovery service during configuration, and the discovery service is part of the platform role, not the application. having a different CRM URL for outlook client and web client can be very confusing to some users.

An Easier Approach
As we have seen, the traditional approach to separating server roles may add some complexity to your CRM deployment; however, that doesn’t men you shouldn’t do it. Rather, there is another approach that achieves the same goals.

This approach is to install the full CRM application on both servers, both pointed at the same CRM databases. On server A, stop the asynchronous service, and on server B, start the asynchronous service. Drive all of your users to the URL of server A.

The end result is that, like with separate server roles, you have all application traffic handled by server A, and all asynchronous load handled by server B, but you avoid all of the complexity of traditional separate server roles. Users will be able to use the same URL for the web and outlook interfaces, and Internet facing deployment will be much more straightforward, requiring only on URL or ssl cert.

This is the approach that we recommend—it will make your life much easier.

Thanks To Alex Fagundes at Power Objects for providing input for this post.

Sourced From: CEBlog

  • Share/Bookmark
Categories: Uncategorized Tags:

MS CRM Resource Center

August 18th, 2010 DynamicsMSCRM No comments

MS CRM Online Resource Center

Although the Resource Center within MS CRM can be often overlooked, it brings together links and information in one location that can be a time saver and a central source for information including:

Information to help you get started.

Tips to make you more productive.

In-depth descriptions of product features and recommendations for using them to build your business.

Examples and advice from subject matter experts.

Easy access to other online resources related to Microsoft Dynamics CRM.

You can find information related to Microsoft Dynamics CRM within the Resource Center, Help, and on other resources available on the Web. Search automatically finds articles, videos, and Help topics based on a word or phrase. Help topics are usually step-by-step procedures based on a specific task. Articles are about end-to-end solutions.

  • Share/Bookmark
Categories: Uncategorized Tags:

MS CRM Large Picklist Import

August 18th, 2010 DynamicsMSCRM No comments

MS CRM XML-Generator for Picklist-values

Using this nifty little tool enables you to generate the needed XML-Code for creating picklist values. Although the browser-based customizing tools of Microsoft Dynamics CRM are very elegant, it still takes time to create the needed values, because it has to be done one at a time. Caution: Only use this tool, if you are really comfortable with manually editing exported XML-Customization Files! Use it at your own risk.

Sourced From: beatnik’s microsoft crm blog

  • Share/Bookmark
Categories: Import, Picklist, XML Tags:

Mobile Express and Blackberry

August 18th, 2010 DynamicsMSCRM No comments

Mobile Express and Blackberry

After implementing Mobile Express in our Microsoft Dynamics CRM 4.0 environment, we found that some users with Blackberry smartphones could not open the Mobile Express site. We knew it was not a bug with Mobile Express, as these same phones could successfully launch Mobile Express in some of our client’s environments, just not ours.

Through the process of elimination, we found that the issue was Blackberry Browser related. The Blackberry actually has two browsers—the Blackberry Browser and the Internet Browser. When you launch the web browser on the Blackberry, if you go to options, General Options, you will see a dropdown for Browser. The default setting is Blackberry Browser, but you can change that setting to Internet Browser. The issue we found was that the Blackberry browser does not correctly interpret security certificates from some providers—that explained why these phones could correctly load the Mobile Express site from some environments but not from others.

Sourced From: Joel Lindstrom, a Solutions Consultant for CustomerEffective

  • Share/Bookmark
Categories: Blackberry, Mobile Express Tags:

Support for Microsoft Dynamics CRM 4.0 on Windows Server 2008-based computers

August 10th, 2010 DynamicsMSCRM No comments

4.0 on Windows Server 2008-based computers

To add the above roles before you install Microsoft Dynamics CRM 4.0 follow these steps:
1. Click Start, click All Programs, click Administrative Tools, and then click Server Manager.

2. Right-click Roles, and then click Add Roles.

3. Click Next to get to the Server Role Screen.

4. Mark the checkbox for the following roles, and then click Next.
Application Server
File Services

5. Click Next to get to the Roles Services for the Application Server.

6. Select the checkbox next to Web Server (IIS) Support. When the Add Roles Wizard box comes up, click Add Required Role Services, and then click Next.

7. Click Next to get to the Web Server Role Services, keep the existing checkboxes that are marked and mark the checkbox next to IIS 6 Management Compatibility, and then click Next.

8. Click Next to get to the File Services Role Services, mark the checkbox next to Indexing Service , and then click Next.

9. Click Install

  • Share/Bookmark
Categories: Uncategorized Tags: